1. Administrator's checklist
- 1.1 General
- 1.2 People
- 1.3 Projects
- 1.4 Task tracking
- 1.5 Time tracking
- 1.6 Dashboards
This Guide is regarding Easy Redmine / Easy Project in Version 12.
Now that your application is up and running, it is time to get it ready to handle your projects and other business activities.
The ability of Easy Project to adapt to any type of organization has the disadvantage of coming with quite a lot of settings, some crucial and some rather cosmetic. Let us guide you through them.
In this logically ordered checklist, we will highlight the most important configurations you will need to consider. Additionally, we'll also explain some tips and tweaks for finetuning.
Regardless of whether you are starting, setting the application up, or already using a configured Easy Project, we recommend you to complete this full list. You may find some handy features that you did not know before.
1.1 General
1.1.1 Global settings (General)
Go to: Administration > Settings > General
- Application title — name of the application. It will be displayed in your browser and bookmarks as the site name, e.g. Easy Software Information System.
- Hostname and path — it is important that this address is correct. It is used in email notifications for generating links to your application. For example, a link to the task 123 will be generated as https://is.easysoftware.com/issues/123
- Protocol — in this digital age, HTTPS is practically a necessity. If you find any security warnings in your browser, contact your server admin to fix them (or contact Easy Support in case of cloud).
- Text formatting — Html is the most user-friendly and strongly recommended option. Unless all your users are developers or web coders, do not even try the other settings.
- Beginning of the fiscal year — this setting will be used in date filtering (fiscal year, quarter). Quite useful in reports and dashboards.
- Search suggester — quick results that will be shown when typing into search field (before you hit Enter). We suggest to select only a maximum of two of the most used entities. From experience — tasks and projects.
- Default full text search types — not to be confused with the above setting. This takes effect for search result after you hit ENTER. It will show you results in the entities you selected. When looking for a different entity type, you can enable it in that particular search. By enabling too many entities in this setting, you will slow down the search for all users.
1.1.2 Global settings (display)
Go to: Administration > Settings > Display
- Language — if all users speak the same language, we recommend you to tick both Force settings.
- Date and time formats should be selected specifically. If you keep Based on user's language, you may receive "bug" reports about inconsistencies.
1.1.3 Global settings (API)
Go to: Administration > Settings > API
API must be enabled if you are planning to use Gantt, Resource management or WBS.
1.1.4 Global settings (Files)
Go to: Administration > Settings > Files
Set a reasonable maximum file upload size. Allowed extensions — whitelist; only these file types will be allowed to upload. Disallowed extensions — blacklist; all except these types will be allowed.
1.1.5 Global settings (Email notifications)
Go to: Administration > Settings > Email notifications
- Notification email address (FROM) — users tend to reply to email notifications and expect that something will happen, so you may want to consider using noreply@…
If you do want to allow users to add comments to task by replying to a notification, you need to enter an existing mailbox and connect it to Help desk (if your ordered a plan with this functionality).
1.1.6 User types
Go to: Administration > User types
Depending on the imported data, you may see one or more preset user types. If there are more user types, first determine which of them you will be using (but keep in mind that sometimes less is more; you don't want to manage 10 different user types for 20 users). You should delete all not used user types, so they are not available in the selection when creating or editing a user.
In these initial steps, just make sure that you enable only relevant menu items. There shouldn't be too many items (for smaller monitors' width) and it should contain only the most regularly used items. When entering custom menu items, use relative paths, i.e. /issues, instead of https://is.easysoftware.com/issues.
An important setting is visibility of user types. For initial configuration, you can allow every type to see all other types.
Finally, what about the Internal setting? These are the restrictions that a non-internal user types have:
- Non-internal users do not see tasks, spent time, attendance and resource management buttons on their user profile.
- Non-internal users do not see saved public filters anywhere, only their own saved private filters.
- Non-internal users do not see estimated hours on assigned tasks and neither in resource management.
- Non-internal users cannot see project activity even if they have the permission on the project.
- Non-internal users cannot log spent time and are not included in Budgets calculations.
- Administrator cannot be a non-internal user even if it's set on the user profile.
Detailed technical documentation: https://www.easyredmine.com/documentation-of-easy-redmine/article/user-types
1.1.7 Export templates
Go to: Administration > Export templates
This setting is not crucial. However, if you are in a larger company with a high level of corporate image, you may be required to set some branded export templates.
For exports of lists, you will need to use the dynamic token %query% that is replaced in the export by the current list you are viewing (for example tasks for billing, report of spent time etc.).
Important: Export templates only work with HTML text formatting (as per setting in chapter 1.1.1).
Detailed technical documentation: https://www.easyredmine.com/documentation-of-easy-redmine/article/export-templates
1.2 People
1.2.1 Global settings (authentication)
Go to: Administration > Settings > Authentication
Authentication required — YES. This is the standard; users must log in to use the application.
Disabling authentication is for cases when your application serves as an open portal with public projects.
By allowing Self-registration you give the opportunity for new visitors to create an account. The account must be activated, either by clicking on a link received in your email or manually by an application administrator (Users > Filter by status — Registered > Edit > Activate).
You can choose to add self-registered users into a certain user group (administration > groups), that can be added as a member of certain projects under a certain role (more in chapter 1.2.3). This would give the newly registered users defined permissions without having to manually add them into projects as members.
Single Sign On — this particular setting is for Kerberos which has a very complex configuration mostly on the server side. Other tested SSO providers are SAML and OAuth 2.0. These configurations are available on page /easy_sso, where you can configure Easy Project not only as an identity service, but also as an identity provider.
Two-factor authentication with TOTP requires external mobile apps (e.g. Authy, Google Authenticator, etc.) and can be set easily. SMS authentication requires advanced configuration of an SMS gateway connection to Easy Project.
Nevertheless, by enforcing strong passwords from your users and automatic session expiration, their accounts will be safe enough. Two factor authentication should only be used if required by official security policies.
Detailed technical documentation: https://www.easyredmine.com/documentation-of-easy-redmine/article/authentication
1.2.2 LDAP authentication
You can ignore this chapter completely, unless your company uses Active Directory or another LDAP user structure.
Go to: Administration > LDAP authentication > New authentication mode
Fill in the required fields. We recommend you to enable On-the-fly user creation. Otherwise, you would have to manually create users in Easy Project and they would only be mapped and connected via LDAP.
Detailed technical documentation: https://www.easyredmine.com/documentation-of-easy-redmine/article/ldap-authentication
1.2.3 Users and groups
Go to: Administration > Users > New user
Most important information for user creation:
- Login and email — have to be unique.
- User type — determines the main menu and other users' visibility.
- System group — never apply this for real human users. It is intended for special cases, e. g. when connecting applications via REST API.
- Administrator — sees and controls everything. Keep number of admins on a reasonable level.
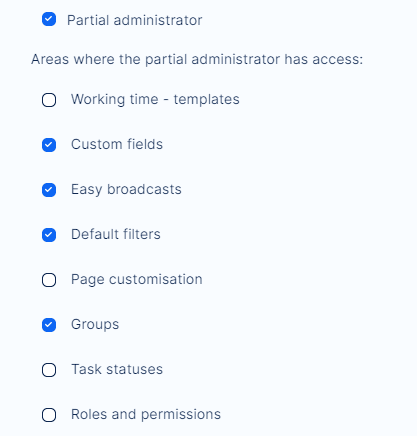
- Partial administrator — can access selected areas in administration and perform all related operations in that area.
- Authentication mode — if applicable, here you select the LDAP modes.
- Time zone — if none is selected, time zone is used from the server. When using cloud, server time is available on page /admin/info at the very bottom. However, we recommend to always set a particular zone for each user.
- Mail signature — this is important especially for help desk operators or sales representatives who send messages from Easy Project to outside customers.
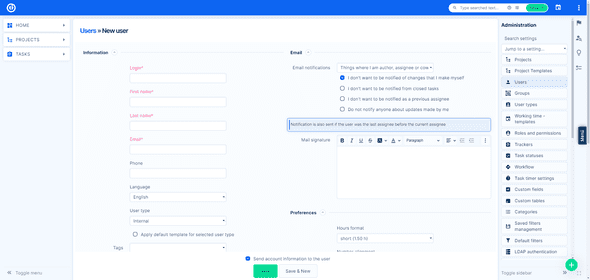
Once the user is created you will find some new tabs at the top of the form, where you can quickly assign the user to groups, projects, working calendar or see the layout of their home page. More about these topics will be explained in the chapters to come.
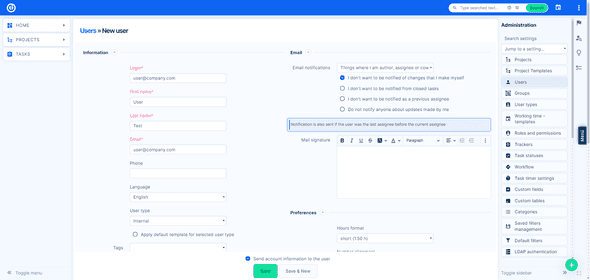
Let's just focus on user groups for now. Administration of user groups is very simple — Administration > Groups > New. Name the group and add users after you create it.
User groups make it easier to filter tasks or spent time or any other entity — instead of selecting users one by one, just select a group. Or it helps in the task assignment process — assign a task to a group and let the members choose which particular user takes it. But most importantly, groups allow quick/automatic assignment of users to projects. You just need to add the group into respective projects under a certain role, and all users who become members of the group will automatically become members of each project. The same logic applies when users are removed from groups. Also, when you delete a group, all its users will be removed from the projects.
When you are setting up your application, you might want to consider creating some basic groups which will make your life easier for the future project membership administration.
1.2.4 User custom fields
Go to: Administration > Custom fields > Users (or New custom field > Users)
In addition to the native attributes, you can add a custom attribute, like phone number, department, job title, etc. This will be the case for other entities in Easy Project as well (tasks, projects, milestones, etc.). It is always tempting to let your imagination run wild in such cases, but at this point, just keep it simple. Create only those custom fields that are absolutely necessary. You can add others later. You will probably use formats like Text (for job title) or List (for department). You will find these fields on user edit form.
Detailed technical documentation: https://www.easyredmine.com/documentation-of-easy-redmine/article/custom-fields
1.2.5 Page templates
Go to: Administration > Page customization > My page
Every user has their own homepage — personal dashboard/workspace. It is the first page you access when you log in, and it's always available in the main menu under Home button. This page is customizable, so every user sees exactly what they need to.

Our recommendation is to disallow your users to change their own homepage at least during the first few months (via roles and permissions — chapter 1.2.7). Users in the same position should have unified homepages. Otherwise, some may make changes that will disrupt their work (for example they may hide some tasks they should be watching).
If you decide to build your own page templates, we again recommend to keep it simple. If there are too many modules, users will get lost. Also, if there are long lists, users get lost — keep a reasonable maximum limit for lists (between 10—15). When you gather reasonable feedback, you can make continual optimizations.
1.2.6 Working calendars
Go to: Administration > Working time — templates > (New)
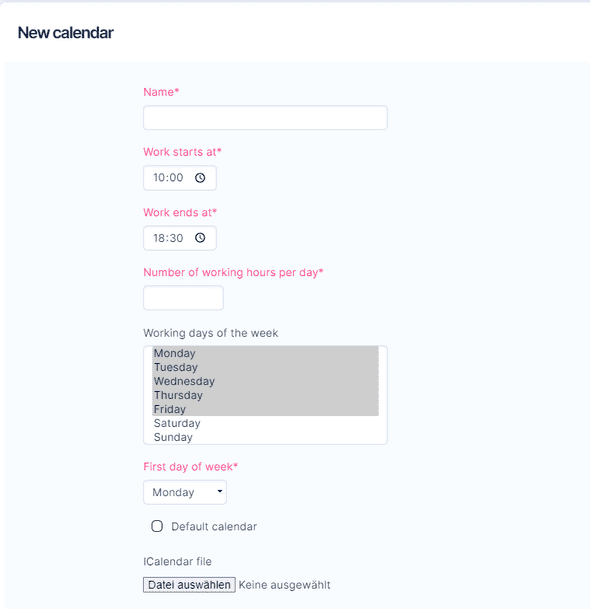
Working calendars allow you to set a working regime for the whole company (Monday—Friday, 9—17 with 0.5 hour for lunch), set specific calendars for part time users and even set a custom calendar for specific users. Setting of user's calendar determines the time and attendance reports of the user (more in chapter 3.4.3).
Notes:
- Work starts/ends at — the difference between these values is the total hours user should be at work, in our example 4.5 hours. Also, when using the Attendance features, and logging half-days in the morning/afternoon, it prefills the according time period.
- Number of working hours — How many hours you are supposed to work — how much time should be logged on tasks and projects in one day. In our example, you can simply calculate that 0.5 hours remains for lunch.
- Working days of the week — Here you define weekends.
- Default calendar — if ticked, this calendar will be automatically assigned to every new user.
Detailed technical documentation: https://www.easyredmine.com/documentation-of-easy-redmine/article/working-time-calendar
1.2.7 Roles and permissions
Go to: Administration > Roles and permissions > (New)
If you don't have any roles yet, you will need to create a new one. This setting is rather complex, because it concerns a wide variety of areas throughout the whole application. The most used areas are Project, Task tracking and Spent time.
The individual permissions are quite self-explaining. But there are some general principles you need to understand.
Global vs Project permissions
All the particular permissions are divided to two main groups:
- Global — these permissions do not have a project context; they can be used in the application overall. For example, Use to-do list — it is a feature not tied to any specific project, it is available anywhere in the application.
- Project permissions — these are applied only to the specific project where the user has this role. For example, Create tasks — tasks are always tied to a project, you cannot have a task without a project. If you are in a manager role on project A and a worker role on project B, you can only create tasks on project A, because workers are not allowed to create tasks (as an illustrative example).
You may be thinking "Fine, but roles are always defined on projects, so how does global permission work?" That is a good question. The answer is fairly simple — global permissions are applied from all roles that you have on at least one project. So, all it takes is to have the CEO role on one project and you have all the global permissions of the CEO.
That's not too secure, is it? We got it covered. Ability to give roles to other users in the project is also under permissions — Manage members, and even there you can define which roles can be given. Also, keep in mind, an administrator can give any role to any user.
Using our evergreen principle — keep it simple, from the beginning it will be enough to use three role levels (Top manager, Team leader, Team member) to start with. Then based on your experience you can make tweaks and possibly add new roles for specific cases.
Special roles — non-member, anonymous
In the roles and permissions list, you will always see two unusual roles that you can't delete. What do they mean? Back in chapter 1.2.1 (Authentication settings), we mentioned disabling authentication — the app will be accessible without login. Well, a user who is not logged in the application is considered Anonymous and their permissions are applied from this very role. If your app requires you to log in, this role doesn't concern you at all.
Non-member — global permissions are applied to all registered users in the application. Project permissions are applied to users who are not members of the project but can see it.
Both of the aforementioned roles can see contents of Public projects and their project permissions are applied to them. Regular projects are not public, but you may decide to set some projects as public to make them available to all users without making them members.
What do R, M, L stand for?
Next to specific permissions you may see some mysterious letters next to them.
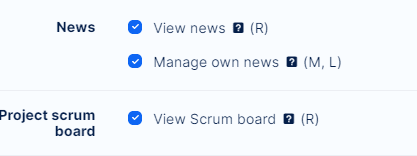
- R Read only — this permission allows you to see data, but not create, edit or delete anything.
- M Member — you have to be a member of the project => this permission doesn't apply to non-member and anonymous roles.
- L Logged in — you have to be logged in the application => this permission doesn't apply to the anonymous role.
1.3 Projects
1.3.1 Global settings (projects)
Go to: Administration > Settings > Projects
- Default modules and task types — choose only those that you are sure that will be used for all projects. Otherwise, some simple projects will look more complicated than they actually are. These settings don't affect projects from a template.
- Activity is selected when creating a task (or editing a task) — we recommend you to keep this disabled, otherwise you may have problems with creating/editing tasks via Gantt, WBS or Quick planner.
- Assign activities to roles — keep it simple, keep it disabled. It makes sense when you reach a certain point — too many roles, too many activities. Or when you have very strict time tracking rules.
- Display custom project identifiers — keep it disabled, it only complicates project creation. It is used in very specific cases only.
- Role given to user who creates a project (a subproject) — make sure you select a role. Otherwise, the first in the list of roles will be assigned.
- Calculate project start/due date — there are pros and cons to this setting. When enabled, you don't have to worry about task start and due dates; you will not be warned that task dates are out of the project date range, but you will not be able to filter and sort projects by dates. When disabled, you can filter and sort projects by dates, but you will get error messages when task dates are out of the project date range (for example when moving task from a different project).
1.3.2 Project templates
Go to: Administration > Project templates
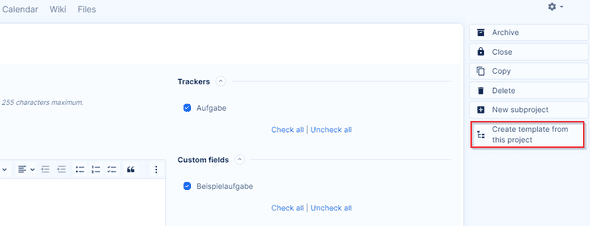
How to get templates into your application?
From existing project
Go to: an existing project in your application > Settings > Information > Create template from this project.
1.3.3 Project priorities
Go to: Administration > Categories > Project priority
Nothing scientific here, just set 3—4 project priorities. For historic reasons, the ordering is that the highest priority is the bottom, the lowest priority is the top in this setting.
1.3.4 Project custom fields
Go to: Administration > Custom fields > Projects (or New custom field > Projects)
Decide on how you want to categorize your projects (but not overcategorize). Some regularly used examples include, for example, Project Phase (List), Shipment date (Date), Project type (list).
Detailed technical documentation: https://www.easyredmine.com/documentation-of-easy-redmine/article/custom-fields
1.3.5 Project overview templates
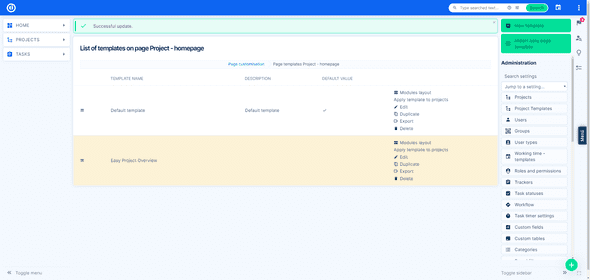
Go to: Administration > Page customization > Project — homepage
Project overview is the first page of a particular project.

Default page template is applied on new projects. Page templates can be applied to existing projects. From our experience, we definitely recommend using these modules: Project description, Project info on the Overview page. Project members or Subprojects can also be a part of this page.
1.4 Task tracking
1.4.1 Global settings (task tracking)
Go to: Administration > Settings > Task tracking
- Show task ID — this is practical when you work with smaller tasks, it helps you navigate and refer to specific tasks quicker and more easily.
- Display subprojects' tasks on parent projects by default — the less invading option is to keep this disabled. Whenever you open a task list on a project, you will only see tasks on that particular project, no other tasks will be shown. If needed, you will always be able to include tasks from the subprojects via a filter.
- Use color scheme for — we recommend you to use Priority for task coloring.
- Allow to set task due date after milestone date — this setting seems very specific; it has an impact if you are going to use milestones on your projects. By enabling this option, you will not be stopped when moving the due date of a task beyond the date of its milestone. Instead, the milestone will be moved accordingly. If disabled, users will receive an error message if they set an incorrect due date of a task.
- Private tasks — it is a complication and you need to set according permissions for it. We recommend you to keep this disabled. See in the course of a couple of months, whether this feature is really required from your users.
- Cross project subtasks — to keep tasks in order, you should keep this disabled. To connect various tasks between projects, you can always use task relations. Parent-subtask tree is best to keep in one project.
- Allow cross-project tasks relations — a good substitute for the above setting.
- Allow task assignment to groups — this will only work when the group is added as a member of the project. If all users from the groups are added individually, this will not work.
- Calculate the task done ratio by — Use the task field = users manually enter %done on the task based on their qualified estimate. Use the task status = on each task status you set how big task completion it represents. For example, New = 0%, In progress = 50%, Review = 90%. With this setting you cannot enter %done manually.
- Ignore workflow for administrators — workflow, as you will soon find out, has strong impact on working with tasks. By enabling this setting, you are taking a risk that an administrator will change the task in a way that regular users will not be able to work with anymore. We recommend you to keep this disabled.
- Task export limit — limit is in fact applied to all exports, not just tasks. Keep this setting reasonable. Exports of Easy Project's complex lists will take long with too many items. Also, during the export generation, other users' application speed may be impacted. Does it really make sense to have a paper with more than 500 items? Who really reads it?
- Parent tasks attributes — to have more control over individual tasks keep the settings independent. By choosing calculated from subtasks, users will not be able to manually set those attributes on the parent task, and may be confused by this situation.
1.4.2 Task types
Go to: Administration > Task types
The next three chapters are going to be closely interconnected, so just read these lines patiently and it will all become crystal clear in the Workflow chapter.
If you are just starting with Easy Project to manage regular work of a team up to some 25 users, you won't really need anything more than one task type, called Task. You may eventually find that you would like to better differentiate the type of work your users will be handling. How- and whenever you come to the realization of the need to specialize your work assignments better, it will start with task types.
Task type can be simply understood as a type of a work assignment, for example, Audit, Documentation, Architectural proposal, Construction, Workshop, Programming, etc. Task types are user defined; you have complete control over them.
Attributes of a task type
- Default status — when creating a task in this task type, this status is prefilled.
- Icon — used in Scrum/Kanban.
- Standard fields — the less fields you have on tasks, the less attention will they attract from your users. A functional minimum is to enable assignee, description, start/due date. Enable the field parent task if you are planning to build task structures (parent-subtasks for example in WBS). Enable estimated time if you are going to plan work in Resource management. %Done has a functional effect with Earned value management. For advanced project management you will also take advantage of milestone, which are neatly managed in Gantt.
Task types can be enabled/disabled per project. And they can have their own set of custom fields.
1.4.3 Task statuses
Go to: Administration > Task statuses
Custom definable task statuses are what makes Easy Project such a powerful and flexible tool. Our experience from hundreds of customer implementations indicates an initial solution consisting of four statuses: New > In progress > Approval > Closed.
We recommend to start with equivalents of such stages, named according to your own practice. The last one should have the Task closed option ticked.
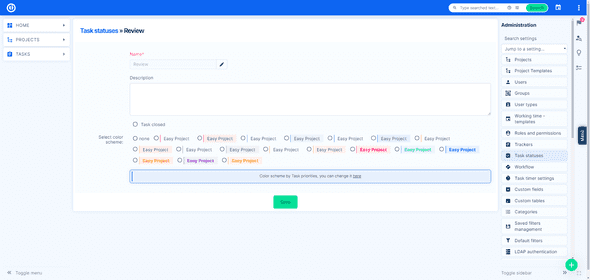
Separating open and closed tasks is important for effective task listing and reporting and has useful functional consequences.
Statuses can be sorted by dragging them in the list, to make their selection by users more intuitive.
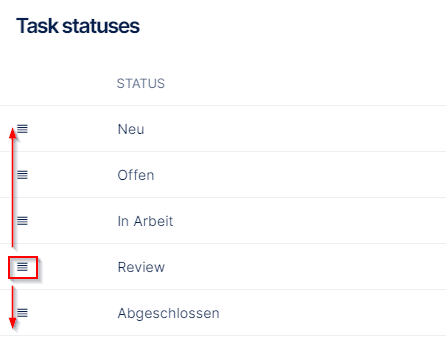
1.4.4 Workflow
Go to: Administration > Workflow
Now that we are familiar with task types and statuses, we can define the task lifecycle, i.e. how the statuses may progress. Workflow puts together the user's role, task's task type and current status and evaluates what the user can do with the task.
Let's just explain this in a simple user story. Team members answer to their team leader = their work must always be evaluated by the team leader.
This can be ensured via workflow, so you disallow team members role to close tasks, but only allow them to use status Review to hand over their work. Team leaders will have a queue of tasks in that status from their team members, and only his role can close the task.
This is how it looks in workflow setting — a team member has all the options to close the task disabled, while team leader has this option available. Also, the team leader is allowed to reopen already closed tasks.
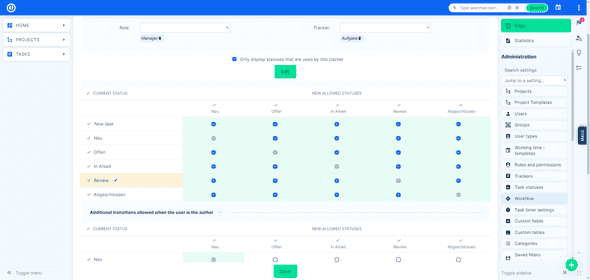
By default, newly created statuses are always disabled for all roles and all task types, which is why it is necessary to configure workflow every time you create a new status.
But that is not the only function of workflow. Switch to the second tab — Task fields permissions — to control which fields can be edited freely, which are read-only, and which are required.
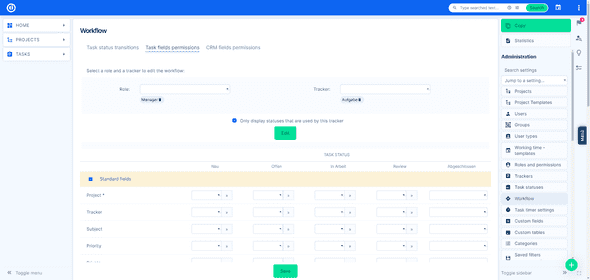
We need to warn you about the required option. It may be a cause of frustration for users when they receive the error messages too often (due to empty required field when they changed status), which then may result in a less staright forward adoption of the application. Please take this into consideration before setting any field as required and use in moderation. Keep in mind you want to simplify life with Easy Project, not complicate it.
1.4.5 Task priorities
Go to: Administration > Categories > Tasks priorities
Priority is another of the required attributes of every single task. The most common number of priorities is about 3—5, equivalents of Normal, High, Low, Immediate, or similar. The most regular priority should be set as default, in our case Normal.
To use more than 5 priorities, it is necessary that all users fully understand what each priority means to avoid misuse. You may also consider the option of setting workflow to only allow selected roles to edit priority.
Priorities are manually ordered (like statuses), however, their order in the setting is reverse to the order in the task list. Let us explain in the example below.
Low priority is at the top of the list, DO IT NOW is at the bottom. It is quite clear which is the highest. When sorting tasks in a list by priority, ascending order is from Low to DO IT NOW, descending order is from DO IT NOW to Low.
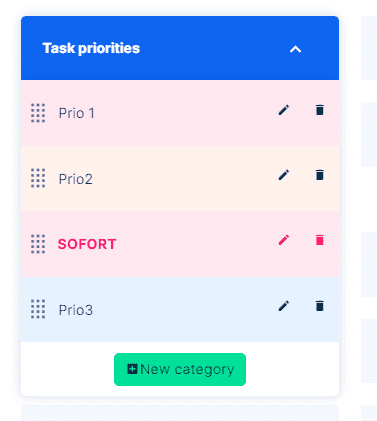
Yes, it looks illogical, but it is already used by too many companies this way, so switching it in the application would cause too much unnecessary work for all admins. After all, it is just a one-time setting that no one really has to care about after the initial set up.
1.4.6 Task custom fields
Go to: Administration > Custom fields > Tasks
Custom fields are additional attributes of tasks, just like in projects. Every attribute of the task should be intuitively understood by users who can see/edit it. When you have too many of them, users will get confused and will rather ignore all of them.
A great feature of task custom fields is they can be enabled/disabled per projects and task types. They are also a part of workflow fields permissions settings. Which altogether allows you to use them only where they are really necessary and leave them out of tasks where they would only obstruct.
This functionality is vast, and you can experiment as much as you can to build a comprehensive registry system. But that would take too much space in this initial setup manual. So, here are some short tips from us based on experience and frequent misuse:
- Required — if you decide for this option, make sure to set a default value for this field. Otherwise, you are complicating the creation of tasks. Even worse, you would be completely forbidding task creation via email (from Help desk) or from an external system via API.
- Instead of format List, use Key/value list instead — regular list is kept for historic compatibility reasons. Key/value list works much better with value addition, editing and deleting.
- Set Use as filter reasonably — it is another tempting option to enable, but do you really think someone will filter tasks according to a Text field? Too many available filters complicate working with a task list and, in extreme cases, may slow down loading of task lists.
- There is an interesting option Show as additional attribute — it comes handy with fields that are generally filled in during task creation (for example for categorizing purposes), but then during the course of the task, nobody needs to touch them at all. This option will hide the field when updating a task under the Edit more attributes button, so that the user can focus on the important fields.
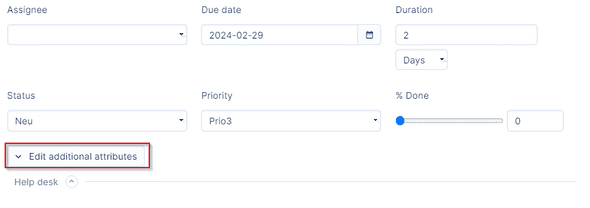
- How to connect tasks with other entities? Simply, use the Lookup custom field. It enables you to link tasks with other types of entities in the application, e. g. documents, users, contacts.
Detailed technical documentation: https://www.easyredmine.com/documentation-of-easy-redmine/article/custom-fields
1.4.7 Action buttons (Easy buttons)
Go to: Administration > Easy buttons
In this chapter, we are going to slightly break the rule of this manual — setting up an initial state of the application. However, knowing about this handy functionality may come in useful within the first days of using the application.
Action buttons are great timesavers for often repeated operations with tasks. They allow you to make multiple changes in tasks just in one click.
Here is an example. Your process dictates that after you did your work on a task you must return it to the author (person who created the task). Normally you would need to click Update, select Status, select Assignee, click Save = six clicks. With the action button, it is just one click.
Action buttons set up
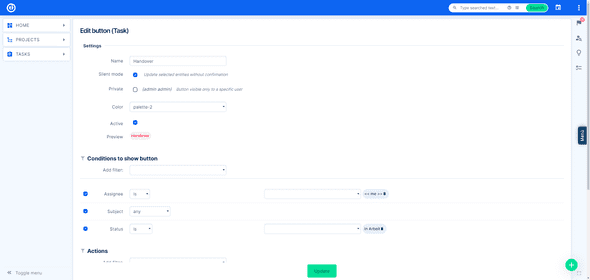
- Entity type — choose a task and name it.
- Silent mode — if disabled, you will be able to enter a comment and will need to confirm the change (one additional click).
- Private — no other users except the creator of the button will see it.
- Active — you may choose to temporarily disable some buttons by unchecking it, instead of deleting.
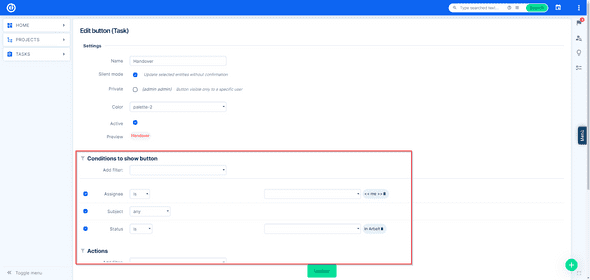
- Conditions to show button — the button will only be shown on tasks if all these conditions are met. Example: I can only use the button on tasks assigned to me which I am currently working on.
- Actions — what happens when you click the button. Example: Task is reassigned to the author for confirmation.
The button is shown under the task attributes.
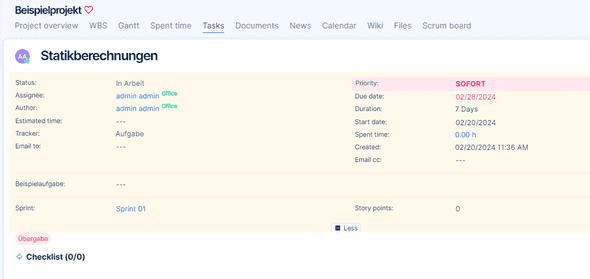
You can surely see the value of this feature, but you don't need to spend time on it now. Wait a week or two, ask your users what their most repeated changes are and then set up the buttons, based on real experience. Our recommendation is that users should not see more than two or three buttons at once.
1.4.8 Task filtering
Go to: Administration > Filter settings > Tasks
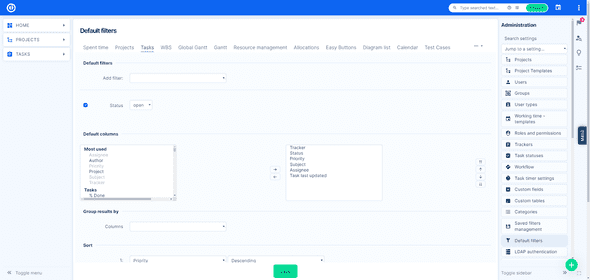
This is where you set up the default filter — the default form of the task list, when opened by any user. Definitely set the filter Status — open, you don't want to see old, closed tasks by default. As for shown columns — keep in mind the width of your users' displays. One topic you should think about is whether (and where) to put the column Project. If it is in the first column, users may click on the project instead of the task and get lost this way. You should consider putting task name (Subject) in the first column.
Naturally, users will be able to set filters view columns ad-hoc according to their needs at the time. But you can help them to a good starting position.
Go to: Administration > Saved filters management > Tasks
Here you may predefine other types of task listings (including charts, or pivot tables — reports). Saved filters are shown on the right sidebar of the task list or presented at the heading.
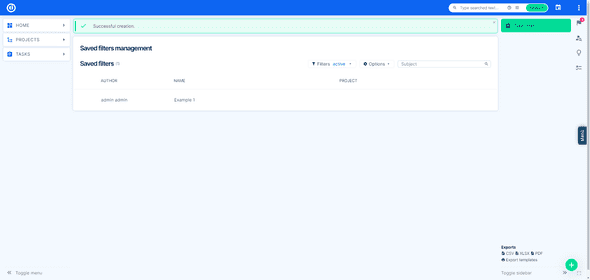
There are infinite possibilities of viewing task sets, you can really go wild here. But as you very well know, we will ask you to not get carried away at this moment. For starters, we recommend you to create filters for Overdue tasks per user, or High priority tasks per user. Leave the more complex reports for later based on your practice.
1.4.9 Checklists
Go to: Administration > Checklist templates
Checklists are definitely worth mentioning. They may simplify the task description and ensure 100% delivery of each task. Here's how it looks on a task.
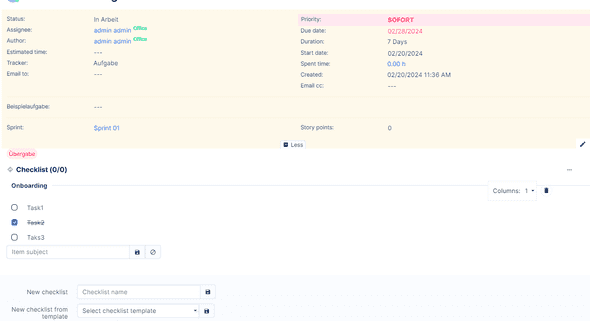
You may consider using checklists on certain types of tasks, and checklist templates for those using the same procedures.
In the setting of a checklist template, you will predefine the templates that will be usable when creating a task. There are also some simple settings — whether (un)marking of items should be captured in the task history; and whether task's %done ratio should be updated when (un)marking items.
The condition to use checklists is to enable the project module Easy Checklists on the project (project settings > modules).
Now that you are aware of this useful feature, it doesn't mean you have to enable it on all tasks. Don't make it just another item that users must fill in, enable it where it is most useful.
Detailed technical documentation: https://www.easyredmine.com/documentation-of-easy-redmine/article/checklists
1.4.10 Agile settings
Go to: Administration > Default Scrum / Kanban settings
Naturally, if you don’t use agile methods in your projects, you can ignore this section. However, if you do manage agile projects, here is where you prepare the default configuration of your Scrum or Kanban based projects.
Settings on both sections are practically identical, but it is important to distinguish the difference between the types in the logic of Easy Project (which, of course, follows the generally recognized standards).
In a very simplified explanation, which is quite enough for the purpose of this manual, Scrum uses Sprints with a set “delivery” date of the whole sprint and capacity is managed within the sprint based on the team which works on that particular sprint.
Kanban, on the other hand, is a way of visualizing continuous flow of tasks. Kanban itself has no due date but is used as a monitoring and planning table for number of tasks in certain (user defined) stages. The capacities are watched by stage (i.e. column), not in the Kanban as a whole.
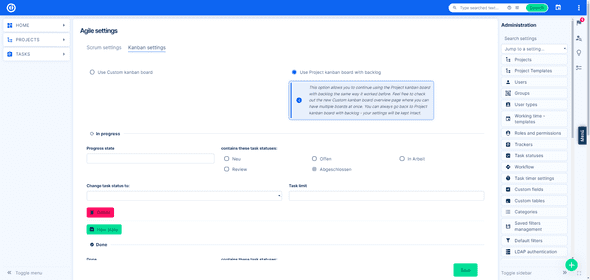
In progress
- Progress state – the phase shown as a column in Scrum/Kanban board.
- Statuses selection (based on statuses, chapter 1.4.3) – when a task is in this status, it will be shown in this column (if the task is updated from inside, not via Scrum/Kanban board).
- Task status (based on statuses, chapter 1.4.3) – status to which the task is changed when you move it via Scrum / Kanban board into that column.
Our recommendations:
- Kanban – progress state = task status As simple as it gets. Each column represents one status. When your processes evolve and you will have more task types and statuses, you then can cumulate some task statuses into one progress state, but that is not necessary at this moment.
- Scrum – Use only one progress state for all your In progress statuses (if you have more of them). Scrum/Sprint delivery recognizes 3 main phases – backlog, WIP (work in progress) and finished (done). There is no need to split the WIP phase into subphases, because the focus is on making sure that each task gets done 100 %, and not to move the task within different phases of progress.
The options beneath the status configuration serves as a preset of how the cards (representing the tasks) look like, i.e. which additional data is shown. By hovering mouse over each setting, the respective section on Preview will be highlighted.
We should remind that these settings are defaults. On each project, you can make adjustments you deem necessary.
Detailed technical documentation: https://www.easyredmine.com/documentation-of-easy-redmine/article/agile-board-scrum-kanban
1.5 Time tracking
1.5.1 Global settings (time tracking)
Go to: Administration > Settings > Spent time
Firstly, we should clarify some semantics. What is spent time, time tracking, time entry(-ies)?
Spent time is a term for the whole concept/functionality of measuring time that was spent by workers on the projects.
Time tracking is understood as the act or process of measuring time. These first two may be occasionally interchanged, so there is no need for concern, when you see one or the other.
Time entry is a single record, with the following attributes, e. g.:
Date: 2nd August; User: Allison; Project: A; Task: 123; Spent time: 2,5 h.
Spent time approvals
Back to the settings. Approvals mean that a user with sufficient permissions (chapter 1.2.7) may approve/reject time entries of users. If a time entry is approved, its status is approved, and more importantly, no one will be able to edit or delete it, not even an administrator. There are no email notifications involved in the spent time approval. That means if you are going to work with this feature, you should prepare some filters for the approvers where they can see non-approved entries.
Limits
We recommend a reasonable limit for the past (~14 days), so that you, or other admins won't have to do this work instead of the users. Logging time to the future should not be allowed at all (0). The daily limit is more for legislative purposes, but to set it at 24 hours does make sense.
Other
The important settings from the rest are Allow logging time on closed tasks (which we recommend you to keep enabled, and When logging time, task must be selected which controls whether you may or may not log time directly on the project.
1.5.2 Activities
Go to: Administration > Categories > Activities (spent time)
Spent time activities are used for another dimension of categorization and reports. Keep in mind that if a user is not completely sure what to select if given some options, they will use the first one. If you create unclear activities, they will not help your reports at all.
At this point you are probably thinking "Here we go again with this keep it simple stuff". And you are right, but in a slightly different sense. There is no harm in creating 4—5 categories, or even more, as long as the user will never hesitate about which to choose and that they will always choose the relevant one. A good example would be Work and Meeting. Every time the user does not have a meeting, they will log Work. What defines a meeting is quite clear and you will have an overview of how much of the day is spent on meetings.
To force your users to select an activity, you may set none of the activities as default — none will be preselected when logging time. In such case, you should be prepared for many questions (at least from the beginning) about why they can't log time, because some activity must always be selected.
1.5.3 Spent time custom fields
Go to: Administration > Custom fields > New (or New custom field > Spent time)
The three previous chapters on custom fields have explained all the information you need to know about them. Just a recommendation not to complicate the life of your users by setting custom fields as required. Better yet, try to refrain from any custom field on spent time. There are already enough attributes by which you are able to filter/report spent time — task attributes, project attributes, user attributes activities.
Detailed technical documentation: https://www.easyredmine.com/documentation-of-easy-redmine/article/custom-fields
1.5.4 Task timer
Go to: Administration > Task timer settings
There are more ways of logging time in Easy Project and the task timer is the most precise of all. It is practically a stopwatch, that does the measuring for you in the background — when you are done with the task, hit the button and time will be prefilled for you to log.
Start timer
- Status — when you hit the button that starts the timer, should the task change into some specific status? We say yes, because by starting a timer you are saying that you are actively focusing on that particular task > the task is being worked on > it should not be closed, or passive, the task should be In progress type of status.
- Assigned to me — should the task be assigned to you when you start a timer on it? Not necessarily, you may be helping a colleague, who is the current task assignee, so you may keep this disabled.
Stop timer
- Assignee — keep it empty for now, there are too many situations when you don't want this.
- Status — if you have mostly small tasks, which you finish in one go, here you can set the status to Done. From our experience, though, the majority of tasks require you to returt them to the author several times before actually finishing them, so, keep it empty — no change.
- %Done — same applies as above, better to keep empty.
- Round time — we recommend not rounding at all. To take full advantage of the precision of task timer.
1.6 Dashboards
Go to: Administration > Page customization
In chapters 1.2.5 and 1.3.4 we went to this setting before to manage My page and Project overview page templates.
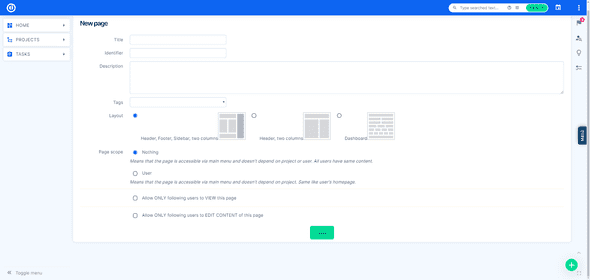
Now, we will look at general dashboards usable for all sorts of cross-company overviews — let's call them global dashboards. You have the option to build them from scratch by clicking the New Page button.
Page properties
- Title — name of the page.
- Identifier — will be used as the URL (link) to the page. In the example on the screenshot the URL would be https://is.easysoftware.com/easy_pages/hr-reports
- This is the form of link for every global dashboard. The fact to remember here is that only users who know the URL can access it. Except for the global dashboard administration (where only administrators have access) there is no other place where these pages are automatically listed. Therefore, you will need to share the link to this page with the relevant users. One of the options is to add it as a Custom menu item on the setting of the user types (chapter 1.1.6).
- Layout — the most flexible is the Dashboard layout.
- Once you create this page, it is not possible to change the layout.
- Page scope — leave it at Nothing. The other options may be used in a custom implementation, but for now, they are not relevant.
- Once you create this page, it is not possible to change the page scope.
It is clear that at the moment of the initial application set up you can't have a clear concept of what kind of dashboards and report types you are going to use, which means this setting may start after a few weeks of production use. Don't spend too much time building dashboards with theoretical reports before you have enough data in the system.
