2. Project lifecycle
- 2.1 What makes a project in Easy Project
- 2.2 Project settings
- 2.3 Project overview
- 2.4 Project lifecycle
- 2.5 Project modules
- 2.6 Project templates
- 2.7 Project portfolio
Now that the application is set up and configured, we can take a look at some effects of the settings, and most importantly to the actual project work.
In the coming chapters, we will take a top-down journey from the highest level — projects, through to tasks and right down to specific time entries.
By understanding their characteristics and relations, you will always be in control.
2.1 What makes a project in Easy Project
2.1.1 Easy Project and project management terminology
We need to commence this section by admitting a few conscious discrepancies in our definition of a project, other terms in Easy Project, and the theory of project management.
The most illustrative example is the possibility to leave the start and/or due date of a project in Easy Project empty. In the PM theory, a project must always have a start and end date. We will still call it a project in the application. We just kindly ask you to forgive this kind of discord.
You may find more similar cases like this. They are caused by the vast configurability of the application. There always remains a configuration that does comply to the official terminology based on PMI and IPMA standards.
2.1.2 Project attributes
The only default required attribute of the project is the Name. The rest is arbitrary.
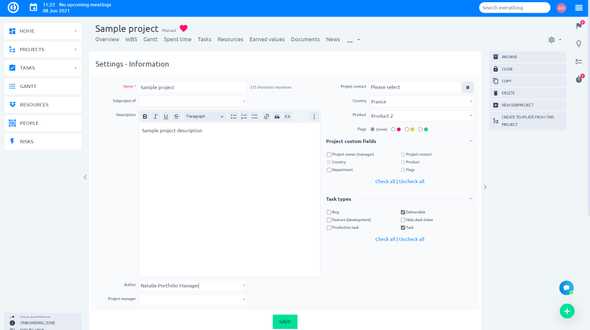
Subproject of (Parent project)
By selecting a parent project, you are able to build the project structures, portfolios, or programs. Depending on the depth of the structure, you may consider the top-level projects as "containers" or "folders", which themselves do not contain any data directly, but simply gather data from their subprojects.
Also, they often have the function of providing general information about the whole section they cover.
Please be aware that changing the parent project in fact means moving the project and all its data, including subprojects. Moving a big project structure may be a very long and exhausting operation (for the server resources) and also the attempt could result in a timeout error.
If you need to change the parent project, we recommend first list all tasks belonging to the current project. If the number is approaching 10.000, you should consider doing this operation via a database or rails console (server solution) or asking our support (cloud solution).
Description
It is the big text field, where you should provide the most relevant information for all stakeholders of the project — the goal, information sources, crucial specifications, expectations of the customer and similar. It is also possible to add images, charts or schemes here.
The optimal length is about two—three brief paragraphs. It is not meant for detailed technical documentation — you can always use the module Documents or Knowledge base for that, while just adding links to those documents in the project description.
Other attributes
- Author — you may consider this field as Project owner to keep fewer custom fields.
- Start/due date — manually entering these dates is available based on a setting. If you don't see these fields, their value will be automatically set based on the earliest start and the latest due date of tasks on the project. For more information see chapter 1.3.1.
- Public — project will be visible to all users, even if they are not specifically added as members. Remember the special roles Non-member and Anonymous back in chapter 1.2.7? No? We don't blame you; this guide is getting lengthy. But you may want to check it again if you are planning to share some information more openly. Public projects are a good option for it.
- Planned — could also be called "silent". This option allows you to assign and schedule tasks without bothering the users by email notifications. You can make any adjustments based on other running projects, and finally when it is time to launch this project, just untick this option.
- Inherit members — this option is only visible if you selected a parent project. Its function is that it copies project memberships from the parent project. If enabled, you will not be able to remove project members who are inherited from the parent project. However, you will still be able to add new members or new roles to existing members.
- Comments on tasks are private by default — useful when there are external co-operators or customers in the project. Private comments are only seen if permission is given (chapter 1.2.7), which should only be allowed for internal roles.
Project custom fields vs. custom fields
On the right side of the project form, there are two sections that might look confusing. Let us clarify this difference straight away.
Project custom fields are attributes of the project directly (more in chapter 1.3.4). So, in this setting, you decide whether to enable/disable these fields.
The custom fields section at the very bottom is to enable/disable the fields on the tasks that belong to this project (more in chapter 1.4.5).
If the boxes are greyed out, it means the fields are set for all projects, therefore you can't disable them.
Modules
Here you decide which features you want to use in the project. When creating a project from scratch, the modules are prefilled based on a global setting (explained in chapter 1.3.1).
You should only enable modules that will really be used. Otherwise, you will have a wide project menu full of useless buttons that will only distract users' attention. These particular modules will be described in detail in chapter 2.5.
Task types
As you know, task types define types of work. Enable only those relevant to each kind of project. It will be easier to submit and manage tasks within the project.
2.2 Project settings
After project creation, you will end up on the settings page of the project, where you will find some additional options.
If you have been reading from the beginning, at this point you are probably getting fed up with all of the settings — you haven’t started any project work, and you just keep setting up something. Let us just step back to remind you that you will not have to worry about any of these settings once they are in place — that is what project templates (more in chapter 2.6) are going to help you with invaluably.
We are now explaining all the important options within the projects, so that you are prepared for any eventuality in the future.
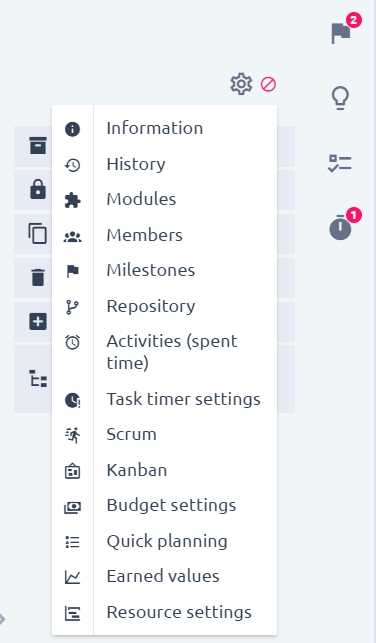
Information
Here are the options you chose when you were creating the project. Project information from this section (including project custom fields) may be shown on the project overview page for all users to read. More on that in chapter 2.3.
History
In this section, you will find a journal of changes in the project attributes as well as comments written to the project about some important announcements or changes. These comments may also be shown in the project overview page.
Modules
Excluding the regular enable/disable modules, here you can also set the default project page, which means when you access the project, you will land on that page first. Furthermore, by clicking Has custom menu ? you are able to rearrange the ordering of the items in the project menu for the utmost convenience.
Members
Adding/removing/editing memberships is intuitive, but there are a few principles you need to remember.
- Inherited memberships can’t be changed — as explained in the previous chapter. You will see those boxes greyed out.
-
Group memberships
- By adding a group as a member, all users in the group will be added to the project.
- It is not possible to remove a user from the project if they are in a group in this project.
- It is possible to add other roles for users in a group.
- If a user is added to a group, they are added as a member to all projects where the group is.
- Users removed from a group will be removed from all projects where the group is set as a member.
- If this user was given another role in the project individually, they will still remain in the project in this role, even if the group was removed.
- You will only be able to manage memberships on roles based on the permissions of your role (chapter 1.2.7).
Milestones
Milestones are important points in time in the project schedule. Here you will see a simple list of milestones and options to create, edit or delete milestones.
The best way to create and edit milestones is via Easy Gantt, where they are neatly visualized along with tasks belonging under them.
However, we do have a few recommendations and general information about the use of milestones.
- Do not use shared milestones for all projects if using project templates — if there is just one milestone shared for all projects, it may cause seemingly random shifts in task and project dates when creating new projects from templates.
- Open — a milestone can have tasks added under it.
- Locked — a milestone is still open, but you can’t add any new tasks under it.
- Closed — all tasks are finished and a milestone is therefore finished and can be hidden from view.
From the main project menu, milestones are listed under the item Roadmap symbolizing the road ahead marked by the milestones.
Repository
Unless you are a software developer, just ignore this section. If you are, please follow online documentation to this feature: https://documentation.easyproject.com/easy_knowledge_stories/64
Activities (spent time)
There is an important decision to be made right in the first setting.
- Activity is selected when creating a task means that the author of the tasks is the one who decides which activity for spent time will be used in this task > users who log time on the task simply enter the hours, not selecting the activity.
- This setting makes it easier for users to log time but complicates it for users creating tasks (one more required attribute to select). Also, if you first used the other option and later switched to this one, it will also complicate the update of tasks that were created without a selected activity — the user updating it will have to choose the activity on the next update.
- This option is useful if new tasks are created only by one person who controls all the project operations.
- Activity is selected when logging time
- Definitely choose this option if there are more users allowed to create tasks in this project.
Additionally, it is possible to enable/disable activities for logging time in this project. Once again, to make the process a bit easier for the users.
Finally, based on a global setting (chapter 1.3.1 — Assign activities on roles), you would see a matrix of roles and activities to configure, which roles can log time for which activities. While it may be a hassle for the setting, you may find from your practice that it would help immensely with the time reports.
Task timer settings
These are identical settings to the global setting of the task timer (chapter 1.5.4). The difference is here you have the option to override the global settings, if you decide the behavior should be a bit different in this project than the rest of the system.
2.3 Project overview
Here is an example of a project overview page. It follows the principles explained in the previous chapters. Consider it a starter recommendation, which you will later be tweaking according to your practice.
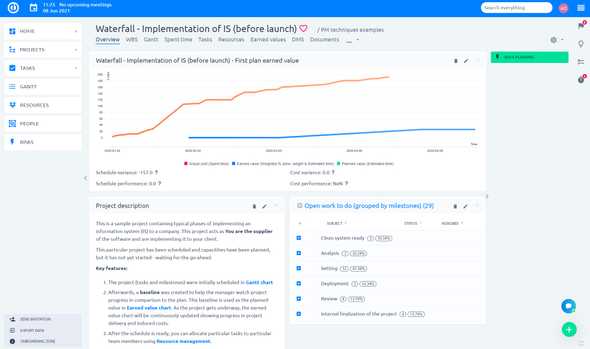
In the coming text, we will be using the term module. The context will be different from the project modules in the previous chapters. These here are so-called page modules — the objects used in customizable pages such as project overview. They are simply different types of modules and it will always be clear from the context.
Moving on, let us describe the modules from the sample overview. The page setup will then become clear for you to use all the other possibilities offered by yourself.
Project description / project custom fields
When editing the project overview page, in the module selection under group Projects choose Project description. In the selection of property to view, you may choose description or project custom fields.
The description is the text you enter in Settings > Project information. That means you can not edit the description directly on the project overview — it is only allowed to certain roles that may edit the project.
Project custom fields can be edited directly on the project overview, but it also has to be allowed for your role.
Project team/project history
The Project team module can be found under the group Modules for sidebar, this name indicates that the module is also optimized for the right sidebar section of the project overview, if you wish to put it there. The larger section on the left, as in our example, is a bit more prominent and better if you have various project teams and it is important to present who the co-workers are on that project.
If you are a smaller company and the team is practically identical on all projects, you may replace this module with Project history which is under group Projects. It shows the comments/updates made on the project by the responsible personnel (entered via settings > history).
Project information
The module we feature on the right-side Project information belongs under group Modules for sidebar. It shows the most important information about the progress of the project, including completion based on spent vs. estimated hours and completion calculated from completion of each task weighted by its estimated time. The indicator shows if there is any trouble:
- Red — project is after due date
- Orange — at least one task is after due date
Finally, beneath the information, you will find some functional buttons.
Tasks from filter
In our example, we included a module showing the highest priority tasks. This module is called Tasks from filter. It may be very handy if you use it with restraint. Use it when there is some free space on the overview to highlight some crucial tasks (for example high priority or overdue).
Do not overload the page by various tasks from filter modules. Just trust us that by putting four different modules with extensive task lists, you will completely miss any relevant attention from the project members. After all, for the best task management and schedule monitoring you always have Gantt.
2.4 Project lifecycle (details)
It took a while to get here, but we have finally completed the settings part of the manual. Now it’s time to work with the projects, tasks, time reports, etc.
Starting from the project perspective here is how a model project lifecycle looks like:
-
List item
- Planning
-
Realization
- Closure
-
Archiving
- (Deletion)*
- We strongly recommend never to delete any project that has some production data. By archiving you achieve practically the same result, but with the possibility to restore the data very easily.
These are project phases based on predefined "statuses" of the application.
Planning
This has already been mentioned in chapter 2.1.2 (Other attributes). During this phase, the manager is preparing tasks and schedules, but team members are not working on them yet.
Realization
This is the biggest/main phase — users work on tasks, log time, upload files; manager manages, etc. From the project perspective, there is technically not much happening, possibly changes in the due date, which you already know how to do. The focus is on the smaller elements, which are tasks and milestones.
To get into this phase, simply uncheck the Planned option in project settings.
Closure
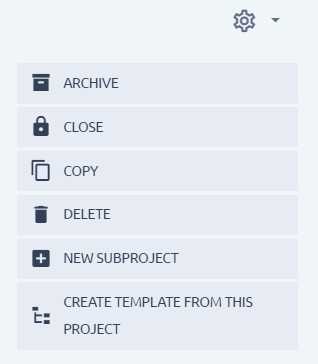
All the further operations are performed from Settings > Information.
By closing a project, you will put it into a read-only state. The project is still visible, searchable as well as all data within the project. But it is not possible to change any data whatsoever.
It is recommended to keep your finished projects in that state for at least a few months after finishing, because some information from it may still be useful.
Closing and reopening project is allowed via specific permission.
Archiving
An archived project is (almost) completely hidden from the eyes of all users, including admins. They cannot be searched; they are not in lists or any selections. The only exception of data visible from archived projects is time entries. Spent time reports need to be complete, and are therefore readable also from archived projects.
If you try to access the project or any of its tasks, directly via the link (e. g. is.easysoftware.com/projects/123), you will get a 403 error (insufficient permissions), regardless of your permissions or being an administrator.
The only way to find such a project is via Administration > Projects and filtering by Archived attribute. From there, it is possible to unarchive (by menu from right-click) a project and see its data.
Archiving a project is allowed via specific permission; unarchiving can be done only by an administrator.
Deletion
Deleting a project may get very costly, which is why we recommend not to allow any role to delete a project. Leave this option only to administrators, who have it natively.
2.5 Project modules
Here is a brief introduction of the project modules — what do the items in the project menu consist of.
2.5.1 Easy Gantt
In our eyes, and confirmed by thousands of users, the most powerful feature in Easy Project project management is the Gantt. It allows you to create and edit tasks and milestones, smoothly schedule the project, manage relations between tasks, save baselines, view critical path and export the whole chart.
This is where most of the managerial work can be handled. A detailed manual for Gantt is available in our online knowledge base: https://documentation.easyproject.com/easy_knowledge_stories/20
2.5.2 Tasks
The task list’s purposes are mainly ad-hoc reports or searching. Filtering and reporting in Easy Project is quite extensive and flexible by supporting list, pivot table (report), or chart outputs.
Any such task reports can be re-used for one-click access via the saved filters function. Just one recommendation here, save only the filters you are sure to use regularly. Too many saved filters and users will get lost, start ignoring them and they will lose time by always filtering ad-hoc.
One reminder, you may also see tasks from subprojects in this list. This behavior is based on the global setting (Display subprojects tasks on parent projects by default — chapter 1.4.1).
Regardless of that setting, you can still manually choose to view tasks from subprojects or not — by using filter Subprojects — none or any.
2.5.3 Spent time
Same as above, the spent time module is the place for all sorts of time reports. Possibility of saving filters naturally can’t be missing here.
2.5.4 Documents
There are two functional sections here. Starting with the easier — at the very bottom you will find the list of all files attached to the tasks of the project. It makes it easy to find a specific file you are looking for. Another (slightly more prominent) function of documents is sorting and categorizing project files into folders.
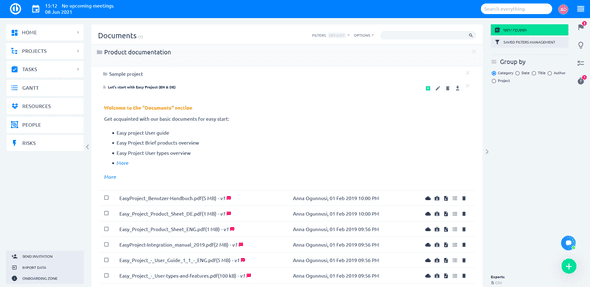
We need to make a clear distinction about a couple of technical terms.
- Document — it is not a file itself, but rather serves as a folder in which the files are stored. In the screenshot above, the document is Document B. Documents can be sorted by category (configurable in Administration > Categories > Document categories), date, title or author.
- File — this is the actual file you upload into the document. In the screenshot, these are the .doc and .xls files. Uploading a file into the document is done via the green "+" button next to the pencil and trash buttons for editing and deleting the document.
This way of sorting the files helps to keep order in your uploads.
2.5.5 Roadmap
If you have created a milestone in the project (for example via Gantt), or there are milestones shared from other projects, the item Roadmap will appear in the project menu. It is a different view of tasks sorted by milestones with elementary analytical data.
2.5.6 Scrum
If there is no sprint on the project yet, you will get into a step-by-step wizard to create one. In the second step, only tasks added to Sprint backlog are those that belong into the sprint.
If a sprint already exists, you will be directly shown the current sprint of the project. On the right menu, you can select to show different sprints.
The columns and card settings are based on project settings of Scrum, which stem from Default settings (chapter 1.4.10 Agile settings)
Detailed technical documentation: https://documentation.easyproject.com/easy_knowledge_stories/39
2.5.7 Kanban
If there is no default Kanban setting (chapter 1.4.10 Agile settings) you will be first required to set columns and card settings.
If the setting exists, you will see the Kanban of the project. Unlike Scrum, there are no sprints to switch through.
There is a very important thing to realize – the tasks are not put into Kanban automatically. The tasks have to be added to Kanban manually (button on the right Project backlog).
Detailed technical documentation: https://documentation.easyproject.com/easy_knowledge_stories/39
2.6 Project templates
Project templates are one of the most important time-savers in the application. While every project is unique (simply by definition), there is no reason why you can’t re-use an existing functioning structure, or skeleton.
The uniqueness lies in the content of the project, such as duration, goal, difficulty, final product, scope, etc. The form may be shared among projects of the same type, for example, house construction, market research, product development, etc.
The project template may be ready with preset tasks and milestones in a general form and prescheduled, with the whole project team. Upon creating a real project from this template, you will enter all specifics and reschedule.
2.6.1 How to create a template
This is very simple, go to an existing project — Settings > Information > Create template from this project. If the project contains subprojects, they will also become a part of the template.
Project templates appear in a separate list available in Administration > Project templates. Non-admins will find them under top menu Projects > Create project from template — it will take you to the templates list first.
You will notice that you are currently in a template by a sign next to the project name.

Who can modify project templates, you ask? Firstly, to be able to access a project template, you have to have the permission to create projects from template, which allows you to see the list of templates. Secondly, you need to be a member of that template in a role that allows to edit project.
2.6.2 How to create project from template
Go to: Settings > Information, where you will find the button to create project from this template.
If the template contains subprojects (sub-templates) these will also be created under the new project. However, if you are creating a project just from the sub-template, it will not contain the parent project from a template.
During project creation you can choose to move dates of tasks and milestones, because, naturally, the template has a schedule in the past (when it was created).
We feel the need to remind you of an important situation, that was also mentioned in chapter 2.2 (Milestones). If you are going to use the function of moving dates when creating projects from a template, first make sure that there are no milestones shared for all projects in your whole application. This would cause a seemingly unexplainable shift in the task dates.
2.7 Project portfolio
2.7.1 Global Gantt
Similar to task management, but on a bigger scale, the most powerful tool for portfolio management is the Gantt chart. While on a view of a single project, the Gantt offers task-related features, on this — Global Gantt — you will find portfolio management tools.
Global Gantt is accessible via MORE menu > Easy Gantt. Global Gantt allows to visualize completion progress relative to projected progress (today); move whole projects in time; quick filter delayed projects; in each project it shows the name of the task that is mostly delaying the project; breaks down the view to milestones and tasks; view resource allocations from Easy Project Business Plan; and, of course, export the chart.
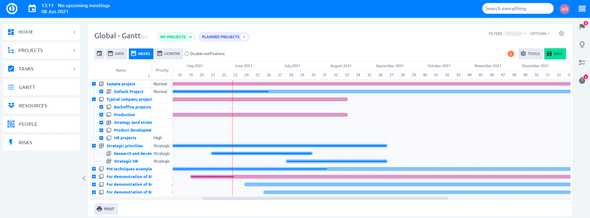
We are often asked about missing features in global Gantt, which are working on project Gantt (such as creating new tasks or show task fields in the list). Yes, it is possible to view the tasks even in the global Gantt, but there are technical limitations for task operations and listing because this view is above projects, not tasks. Also, it is not the best practice for portfolio managers to micromanage specific tasks in the overview of the portfolio.
Detailed manual for Gantt is available in our online knowledge base: https://documentation.easyproject.com/easy_knowledge_stories/20
2.7.2 Project list (tree)
The standard project list can be used for reports, summaries or to locate a certain project somewhere deeper in the structure.
The project list can be found via the main menu item Projects if a user type has it enabled (chapter 1.1.6). We should clarify some details that differentiate the project list from other lists and are commonly misunderstood.
- When you choose to order by some attribute (for example by name), the projects will be viewed all in one level.
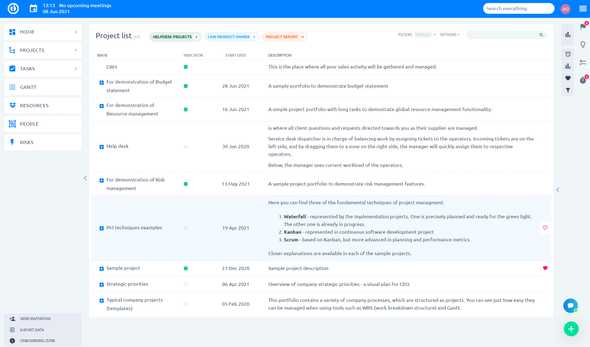
- Unless you set a specific sort order, the projects will be sorted in a tree. Meaning that you will first see top projects, which you can then expand to view their subprojects.
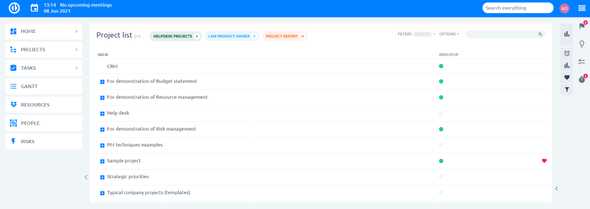
- When using filters in a tree view, you may see results that do not fit the filter. The reason is, that to show the relevant projects, you also need to show their parent projects.
- Sorting and filtering projects by start/due date is possible only if you disable projects dates' calculation – thus entering start/due date manually (chapter 1.3.1).
- It is not possible to show tree view fully expanded by default or to expand all projects by a single button — with a large number of projects, such an option is simply not feasible due to immense hardware demand of such operation.
Project list for administrators
There is another project list in Easy Project, located in Administration > Projects. It is almost identical to the regular list with 2 main differences: 1) It is available only for admins; 2) There is a filter Status where you can select archived to find archived projects and possibly unarchive them (chapter 2.4).